Creating API
5 min read
There are mainly two types of
- RESTful API is created using API-Gateway as trigger.
- Generic ICApp Based API is created using
my-app(App/Device) orWebhookas trigger
1. Creating RESTful API
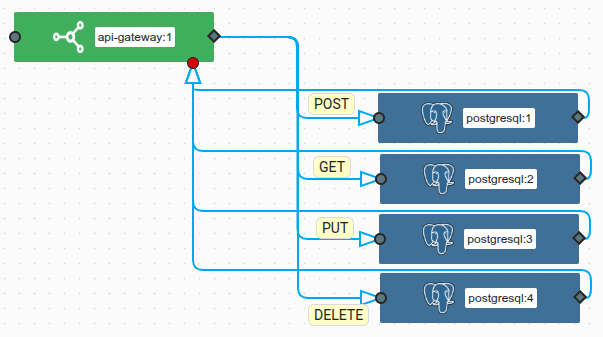
To create RESTful API, you need to use API-Gateway as trigger in your API-Gateway configuration you can define different API endpoint paths (routes) and HTTP methods. API-Gateway supports GET, POST, PUT, PATCH and DELETE HTTP request methods.
All API must use HTTPS (TLS >= 1.2) to make your data to be encrypted when sending end to end and for maximum safety.
Business logic of the APIs are defined using Action(s) in the Action(s) available for you to define No-code / Low-code / Pro-code logic. You can create custom business logic using functions. See How to use Serverless Functions to create your business logic and deploy them as microservices
e.g. CRUD REST API with Postgres as Action:
How To:
1.1 HTTP REST API Endpoints
1.1.1 Base URI
Base URI for the REST API starts with https://ics.rapidomize.com/api/v1/agw and uses your
https://ics.rapidomize.com/api/v1/agw/{icappId}
e.g. if your cfba0c2c-5f61-4866-a3ed-4c2e56f745e7 then the Base URI endpoint is: https://ics.rapidomize.com/api/v1/agw/cfba0c2c-5f61-4866-a3ed-4c2e56f745e7
Coming Soon
OpenAPI 3.0 specification to simplify access to your API spec:1.1.2 REST API Endpoints
All your REST API Endpoint paths need to be prefixed with the Base URI.
https://ics.rapidomize.com/api/v1/agw/{icappId}/{path}
For example, if you have defined an API path to retrieve customer’s data based on their IDs and you defined a the endpoint path pattern as /customer/{id} in the API-Gateway configuration then the URI for the above example cfba0c2c-5f61-4866-a3ed-4c2e56f745e7 is:
https://ics.rapidomize.com/api/v1/agw/cfba0c2c-5f61-4866-a3ed-4c2e56f745e7/customer/{id}
Based on the HTTP REST specification, you could use any HTTP methods POST, GET, PUT and DELETE to build your APIs.
Query Parameters: Your API can also have query parameters e.g.
.../customer?pg=5&psz=10, and you can define what each parameter means in your
1.2 General Guideline For HTTP Methods:
1.2.1 GET - Retrieve Entities/Data
API defined with GET allows you to retrieve Entities/Data from Action(s) used in a database or spreadsheet.
E.g. Endpoint Paths:
- Retrieve a customer by ID:
/customer/{id} - Retrieve a list of all customers as an array:
/customer - Retrieve a list of customers with paging enabled by using query params:
/customer?pg=5&psz=10. where parameters arepg: page = 5 & psz: page size = 10
1.2.2 POST - Create or store Entities/Data
API defined with POST allows you to create new Entity or send & store Data to a destination defined by Action(s) in your
E.g. Endpoint Paths:
- Create a customer:
/customerwith data:
{
   id: '123-xyz'
   name: 'Tom Hanks',
   address: '123 Main St., ....',
   contact: '123456789'
   ...
}
1.2.3 PUT - Update Entities/Data
API defined with PUT allows you to update specified entities or send & store updated Data to a destination defined by Action(s) in your
E.g. Paths:
- Update customer with ID:
/customer/{id}
    {
       name: 'Tom Hanks',
       addr: '123 Main St., ....',
       contact: '9999999999'   <--- updated contact #
       ...
    }
1.2.3 PATCH - Partially Update Entities/Data
API defined with PATCH allows you to partially update specified entities Data to a destination defined by Action(s) in your
E.g. Paths:
- Upate customer with ID:
/customer/{id}
    {
       contact: '9999999999'   <--- updated only contact #
    }
1.2.4 DELETE - Delete Entities/Data
API defined with DELETE allows you to delete Entities or send delete request to a destination defined by Action(s) in your
E.g. Paths
- Delete customer with ID:
/customer/{id}
Coming Soon
HTTP request methods other than above such as HEAD and OPTION will be available soon.1.3 Client SDK
See Client SDK
1.4 Advance Tutorials
Following tutorial shows you how quickly you can create No-code or Low-code API using
2. Generic ICApp Based API
With this method HTTP, Websocket, MQTT or TCP protocols.
To create Generic my-app (App/Device) or Webhook as trigger in your
All API must use HTTPS (TLS >= 1.2) to make your data to be encrypted when sending end to end and for maximum safety.
When using HTTP, only POST, GET methods are supported. PUT, PATCH and DELETE methods are not supported as they do not have any special meaning in the context of Generic
Note that, this type of API endpoints does not contain any {path} as in API-Gateway routes. Payload can be differ for each type of invocation so the content based routing can be used in your
s for routing to different branch of the based on requests.
There are two style of Generic
1. Fire & Forget Style - without a Response:

-
On Success response status for this type of API request:
Status Code / Text Description 204 No Content Operation successful & no content Failure in
Action(s)in theare not reported back to the client.
2. Receiving A Response:

-
Status Codes:
See Status Codes. If client is connected via HTTP, as HTTP allows only single response for a given request, failure in any
Actionis immediately reported back to the client, and no further failures are reported.
2.1 URI Endpoint
URI for the Generic https://ics.rapidomize.com/api/v1/icapp (note that the usage of /icapp in the path) and uses your
https://ics.rapidomize.com/api/v1/icapp/{icappId}
e.g. if your cfba0c2c-5f61-4866-a3ed-4c2e56f745e7 then the URI endpoint is: https://ics.rapidomize.com/api/v1/icapp/cfba0c2c-5f61-4866-a3ed-4c2e56f745e7
Note that there is no specific custom endpoint paths in Generic
Based APIs.
2.2 How To Create Generic
See How To use my-app (App/Device) or Webhook as triggers:
Authentication and Authorization
See Authentication and Authorization
Status Codes
See Status Codes